

Do you have passwords saved in your browser, or are you already using another password manager?
Switching to perc.pass does not mean you have to manually re-enter all your credendials. Thanks to the import feature, you can transfer your existing entries into a new vault and organize them into the appropriate groups along the way.
Follow these simple steps to prepare your data and import it into perc.pass.
Step 1. Export passwords from your current source
Start by preparing a file containing your saved login data. The export method depends on the application currently storing your passwords.
Google Chrome
Open the Chrome browser.
Go to the „Autofill and passwords” section, then select „Google Password Manager”.
Open „Settings”.
In the „Export passwords” section, click „Download file”.
Save the exported CSV file to your device.

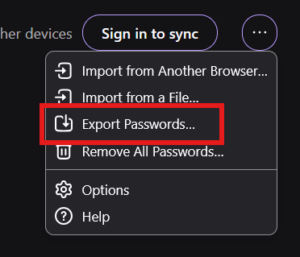
Mozilla Firefox
Open the browser menu and select „Passwords and autofill”.
Click the three-dots menu.
Select „Export Logins”.
Confirm the operation and save the CSV file.
Opera
Open the browser menu and select „Autofill and passwords”.
Click on „Password Manager“.
Go to „Settings”.
In the „Export passwords” section, click „File download”.
- Confirm the operation and save the CSV file.

Microsoft Edge
Open password settings in the Edge browser.
Find the option to export saved passwords by clicking “…”.
Confirm the operation and save the CSV file to your computer.

Other password managers
If you are already using an external password manager, locate the data export feature in its settings.
perc.pass provides an import wizard when you select your data source. Password-protected KDBX files are also supported, and TeamPass is among the integrated import options.
Before exporting, make sure the file format matches one of the options supported by the perc.pass wizzard.
Step 2. Import data into perc.pass
Got your file ready? Now you can transfer your saved passwords to your vault.
Log in to perc.pass and unlock your vault.
Go to the „Your Groups” view.
Expand „More options” and select „Import”. If you do not have any groups yet, click the „Import entries” button.
Select your import source by clicking the tile for the corresponding software, then click „Next”.
Choose the previously prepared file. If you are importing a protected KDBX file, enter the required password.
Select how to organize the imported data.

perc.pass offers three import variants:
Import to a single group – all entires will go into a selected group.
Import to groups according to file – entries will be assigned to matching existings groups.
Import and create groups according to file – the system will create new groups based on the source data structure.
In the final step, you will see a preview of the prepared entries. You can review them and make adjustments before completing the import.
If everything looks correct, click „Import”.
Done!
Step 3. Verify imported passwords and ensure security
Once the import is complete, check that all necessary entries were transfered correctly. Pay special attention to account names, usernames, website URLs, and group assignments.
It is also worth testing your logins on a few of your most important services.
Remember to delete the export file.
CSV files containing passwords are usually saved unencrypted. This means anyone with access to the file can read your stored credentials. After verifying that the import went smoothly, delete the file from your device and remove any potential backup copies.
If you previously used your browser’s built-in password saving feature, you can disable it after verifying your migration so that new login details are saved directly into perc.pass.
Your password are now in perc.pass. What next?
After importing, you can take advantage of the password manager’s other features: automatic credential filling, the strong password generator, password health monitoring, and secure entry sharing.
You don’t have to start with an empty vault or rebuild your access database from scratch.